How many times have you opened your inbox and found hundreds, if not thousands, of unread emails and spam you meant to delete weeks ago?
The chaos has to end. But how do you even begin to tackle this digital clutter?
Today I will walk you through the simple steps of how to delete an email once and for all.
No more letting those unwanted messages pile up. No more feeling like your inbox is running your life.
Time to regain power: it’s delete o’clock.
So, let’s get started, shall we?
Table Of Contents:
- How to Delete an Email in Gmail
- How to Delete an Email in Apple Mail
- How to Mass Delete Emails at Once
- How to Permanently Delete Emails
- Tips for Managing Your Email Inbox
- FAQs: How to Delete an Email
- Conclusion
How to Delete an Email in Gmail
Feeling overwhelmed when deleting hundreds of emails from your Gmail account? Allow me to step in and simplify the process for you.
Step 1: Log Into Your Gmail Account
First things first, you need to log into your Gmail account.
Open up your web browser and head over to Gmail.com. Enter your email address and password, then click “Sign In.”
Step 2: Locate The Email You Want to Delete
Once you’re in your mail account, it’s time to find the email you want to get rid of. Scan through your inbox or use the search bar at the top to track it down.
Step 3: Select The Email
Now that you’ve found the email, it’s time to select it. Just click the checkbox to the left of the email.
Step 4: Click The Delete Button
With the email selected, all that’s left to do is click the delete button. It looks like a trash can and is located at the top of your inbox. And just like that, the email is sent to your trash folder.
Now what about deleting emails in other email accounts like Apple Mail?
How to Delete an Email in Apple Mail
If you’re an Apple user, chances are you use the Mail app to manage your emails. Deleting emails in Apple Mail is just as easy as in Gmail, but the process is a little different.
Step 1: Open The Mail app
To get started, open up the Mail app on your iPhone, iPad, or Mac to access your mail account. You can find the app icon on your home screen or in your app drawer.
Step 2: Find The Email You Want to Delete
Once the Mail app is open, navigate to your inbox and find the email you want to delete. If you’re having trouble finding it, you can use the search bar at the top of the app.
Step 3: Swipe Left on The Email
Swipe from right to left, and a helpful menu will slide into view, featuring the “Delete” option.
Step 4: Tap The Trash Icon
After swiping left on the email, tap the red trash icon to delete it. The email will be moved to your trash folder, where it will stay for 30 days before being permanently deleted.
That’s it. Deleting emails in the Apple Mail app is quick and easy.
If you’re having trouble with how to delete emails on different iOS devices, contact Apple Support.
Now what if you want to delete multiple emails at once? I’ve got a solution for that too.
How to Mass Delete Emails at Once
If you’re anything like me, your inbox is probably overflowing with emails. And let’s be real, who has time to delete them one by one? Luckily, most email clients allow you to mass delete emails at once.
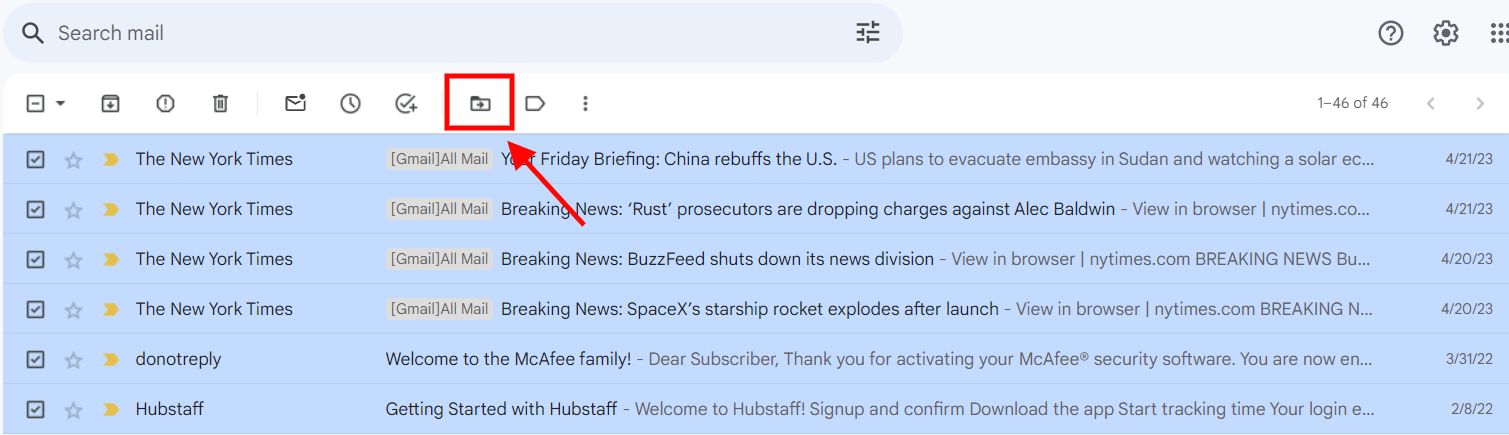
Step 1: Select The Checkbox Next to Each Email
To delete multiple emails, start by selecting the checkbox next to each email you want to delete.
You can select as many emails as you want, but keep in mind that most email clients have a limit on how many you can delete at once.
Step 2: Mark All Emails You Want to Delete
If you want to delete a large number of emails, look for the “Select All” or “Mark All” option. This will select every email on the current page, which you can then delete all at once.
Step 3: Delete the Selected Emails
Once you’ve selected all the emails you want to delete, click the “Delete” button or trash can icon. All of the selected emails will be moved to your trash folder.
Mass deleting emails can save you a ton of time and hassle. Just be careful not to accidentally delete any important emails in the process.
And there you have it – deleting multiple emails at once is a game-changer. But what about permanently deleting emails? Is it possible? You bet it is.
How to Permanently Delete Emails
When you delete an email, it’s not actually gone forever. It’s just moved to your trash folder, where it will stay for a certain amount of time before being automatically deleted.
But what if you want to delete an email permanently right away?
Here’s how.
Step 1: Empty Your Trash Folder
To permanently delete emails, you need to empty your trash folder.
In most email clients, you can do this by clicking on the trash folder and then selecting “Empty Trash” or “Delete All.”
Former PM Gordon Brown asks police to reopen investigation into allegations that News UK covered up phone hacking. Says evidence in civil courts shows it deleted emails to hide them from the police and his phone could have been hacked while he was PM. — https://www.bbc.com/news/uk-68937032
As the tweet above mentions, permanently deleting emails can be important for security and privacy reasons. Just make sure you really want to delete those emails before emptying your trash.
Step 2: Confirm The Permanent Deletion
When you empty your trash folder, you’ll usually see a confirmation message asking if you’re sure you want to permanently delete the emails. If you’re certain, go ahead and confirm the deletion.
And just like that, those emails are gone for good.
Permanently deleting emails is a simple process, but it’s important to be careful. Once an email is permanently deleted, there’s no getting it back.
Related reading: How to Unsend an Email You Sent by Mistake
Tips for Managing Your Email Inbox
How do you prevent unwanted emails from accumulating in your inbox? Here are a few tips.
Unsubscribe from Newsletters
One of the biggest culprits of a cluttered inbox is newsletters and promotional emails. If you find yourself deleting the same newsletters over and over again, it might be time to unsubscribe.
Look for the “Unsubscribe” link at the bottom of the email and click it. You’ll be taken to a page where you can confirm your unsubscription.

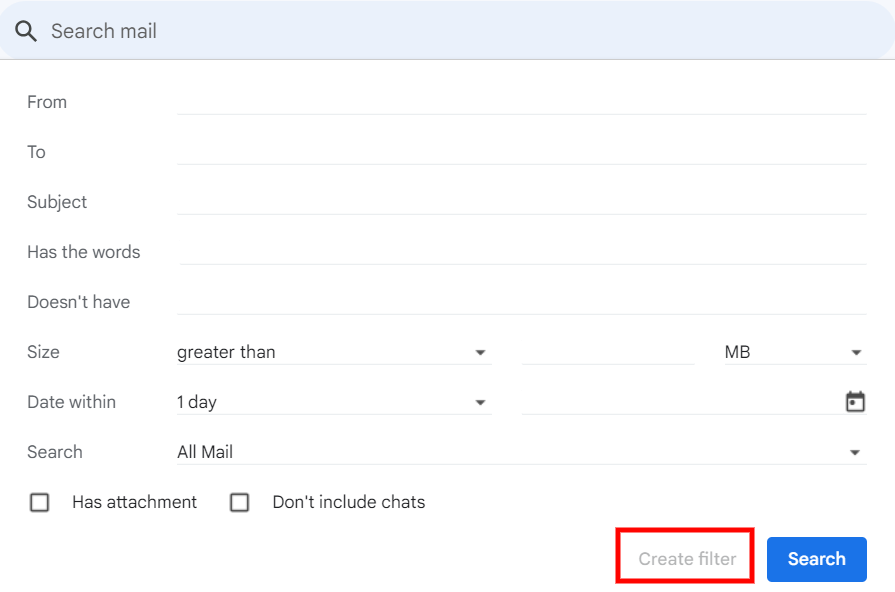
Create Filters
Another way to keep your inbox organized is to create filters.
Filters allow you to automatically sort incoming emails into specific folders based on certain criteria, like the sender or subject line. This can help keep your main inbox clutter-free and make it easier to find important emails when you need them.
Archive Important Emails
If you have emails that you want to keep but don’t need to access regularly, consider archiving them.
Archiving removes the email from your inbox but keeps it in your account, so you can still search for it later if needed.
In most email clients, you can archive an email by selecting it and clicking the “Archive” button.
Is inbox clutter getting you down? Break the cycle by setting aside a few minutes each day to sort, delete, and organize your emails. This way you’ll gain back more free time than you thought possible.
FAQs: How to Delete an Email
How do I delete an already-sent email?
You can’t pull back an email once it’s out. But, for future oops moments, Gmail lets you set a cancellation period.
Microsoft also has a recall feature that lets you unsend an email in Outlook.
How do I permanently delete an email?
To zap that email forever, clear it from your trash or deleted items folder. Poof. It’s gone for good.
How do I delete an existing email address?
Dive into your email account settings and look for the close or delete account option. Follow through.
Can you unsend an email?
Gmail and Outlook offer a brief window to undo send. Act fast though; you’ve only got seconds before regret turns real.
Conclusion
And there you have it. Deleting an email from your email account is really as simple as a few clicks.
But more than that, it’s about taking control of your digital life.
It’s about saying goodbye to the clutter and hello to a more organized, manageable inbox.
And let’s be real – hitting that delete button can be pretty darn satisfying.
Unsubscribe from those pesky newsletters, create filters for the important stuff, and don’t be afraid to let go of those emails you’ve been holding onto for way too long.
Your inbox (and your sanity) will thank you.